Lab 10 - Qt - introduction to the GUI
Qt - introduction to the GUI
Graphical user interface (GUI)
Graphical User Interface (GUI) is one of many ways for providing information to a computer user and, at the same time, of getting feedback from him/her. Each operating system offers its own GUI manager. Currently, the most popular are:
Windows:
- Luna (XP),
- Aero (Vista, 7, 8, 8.1, 10),
- Modern UI (8, 8.1, 10).
Linux:
- Unity (Ubuntu),
- KDE,
- GNOME.
macOS:
- Aqua.
Most modern GUIs are based on so-called widgets, otherwise known as controls. A widget is a single GUI element. It can be: a window, a button, a slider, a field for typing a text and so on. A widget does not necessarily have to be a visible element, for example it can be a container placing other widgets inside a window. Nowadays, most of the available widgets have an object-oriented structure. Each input widget receives user-generated events (mouse clicks, keyboard buttons), as well as system-generated events (including the GUI manager). In response, the widget draws its graphic representation on the screen space assigned to it and/or transfers information from the user to the program and vice versa.
Graphical interface library
In order to use the graphical interface it is necessary to use the graphical interface library, also called the widget library. Each program running under the control of a given operating system (and GUI manager) can use a different set of widgets/controls.
- For Windows systems, Microsoft provides dedicated control libraries in the form of WinForm and WPF, which are a component of the .NET Framework.
- For macOS systems, the currently valid native library is Cocoa.
- Solutions derived from Linux systems, thanks to being open-source, are currently gaining popularity, mainly because of their multi-platformity. Many of them have versions for Linux, Windows and OS X, so that once the application is prepared it can be run on all of those platforms. These include GTK+ (developed for GIMP) and Qt (native library for KDE).
Qt framework
Qt (pronounced cute), besides the widget library also provides a multi-platform programming framework for the C++ language. Qt unifies support for many elements between different platforms, which previously required separate treatment on different systems. This includes support for networks, multimedia, XML and many more. Thanks to the use of Qt the effort put into moving a program written for example under Windows to Linux is minimal. Qt is also compatible with Mac OS X and Android.
Qt is an object-oriented library using C++ language. During the use of Qt it is possible to use all functionalities of C++ language, including the standard library. However, the Qt library implements its own data structures and objects, often with additional, Qt-specific functionality. In order to maintain 100% code compatibility and clarity it is suggested to use those provided by Qt.
Below is a simple console program written using standard library:
#include <iostream>
#include <vector>
#include <string>

int main(int argc, char *argv[]) {
    std::cout << "Hello World!" << std::endl;

    std::vector<std::string> sentence;

    for(int i = 0; i < 4; i++) {
        std::string word;
        std::cin >> word;
        sentence.push_back(word);
    }
    return 0;
}
and using Qt:
#include <QCoreApplication>
#include <QTextStream>
#include <QVector>
#include <QString>

int main(int argc, char *argv[]) {
    QCoreApplication a(argc, argv);

    QTextStream qout(stdout);
    QTextStream qin(stdin);

    qout << "Hello World!" << endl;

    QVector<QString> sentence;

    for(int i =0; i < 4; i++) {
        QString word;
        qin >> word;
        sentence.push_back(word);
    }
    return a.exec();
}
Creating a window application project in Qt
Open Qt Creator, then select File → New File or Project…. In the Projects list, select the category Application, then select Qt Widgets Application. Confirm your selection with the Choose… button.
Name your project and select a location, press Next.
The next window allows you to define the name of the class that will be the base of our window application. Usually this base class is the MainWindow widget (remember that the window is also a widget), which is the main window of the application. The name of the main window can be changed. It is important that our class inherits from QMainWindow (see: Base class). Make sure that Generate form is checked, so the wizard will automatically create a file describing the appearance of the main window. Press Next. In next window option for choosing a language translation appears, this part we can skip by pressing Next. Following window allows for choosing a tools kit, this part is similar to one described in Lab 01 - semester I. Press Finish.
The template of the window program using Qt
Creating a project from a window application template will add
additional files describing the main window to the project:
mainwindow.h and mainwindow.cpp describing the
window class from the code side and the file mainwindow.ui
containing the description of the window layout (appearance).
The starting point for the program is the main.cpp file,
which contains the main function:
#include "mainwindow.h"
#include <QApplication>

int main(int argc, char *argv[]) {
    QApplication a(argc, argv); // creates "application" object
    MainWindow w; // creates main window object
    w.show(); // shows main window

    return a.exec(); // starts application event loop
}
It can be seen that the above structure is similar to the console
example from the introduction. QApplication a(argc, argv)
creates an object that is the Qt main loop that handles events. An
instance of the MainWindow object is then created. Finally,
a.exec(); runs the Qt event loop.
In the Qt library, all objects ultimately inherit from the
QObject class, no different for the main window class
created automatically by Qt Creator. In this case, the inheritance order
is as follows: QObject → QWidget →
QMainWindow → MainWindow. The declaration of
the main window class is as follows:
#include <QMainWindow>

QT_BEGIN_NAMESPACE
namespace Ui { class MainWindow; }
QT_END_NAMESPACE

class MainWindow : public QMainWindow
{
    Q_OBJECT // macro required for Qt meta-object functionality

public:
    MainWindow(QWidget *parent = nullptr);
    ~MainWindow();

private:
    Ui::MainWindow *ui; // pointer to GUI elements of the window
};
It is of course necessary to implement the individual elements of the main window class. Qt Creator did it for us automatically and it looks like this:
#include "mainwindow.h"
#include "ui_mainwindow.h"

MainWindow::MainWindow(QWidget *parent)
    : QMainWindow(parent) // calls base class constructor
    , ui(new Ui::MainWindow) // allocates memory for GUI object and calls its constructor
{
    ui->setupUi(this); // initialises GUI
}

MainWindow::~MainWindow()
{
    delete ui; // deletes GUI object
}
At this stage, the constructor only configures the GUI, while the destructor, called when the application is closed, removes the GUI information from the memory.
🛠🔥 Assignment 🛠🔥
Run the program created from the template.
Using Qt Designer
By double-clicking on any file with the .ui extension
(in our case mainwindow.ui) the editor of the program
changes to Qt Designer. This is a mode in which we can use drag and drop
to prepare a GUI appearance.
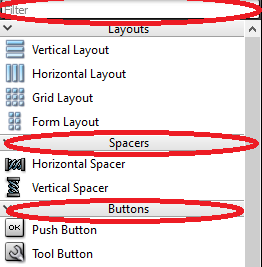
On the left side there is a vertical bar containing a list of standard Qt widgets. Widgets are grouped depending on the basic functionality. At the top there is also a Filter bar that allows you to search the list:

🛠🔥 Assignment 🛠🔥
Familiarize yourself with the list of widgets. Are all their names, including drawings, clear enough to explain how they work? If necessary, use Google search engine.
Use the drag and drop method to place one
QPushButton, oneQLabeland twoQLineEditwindows on the project. Try to change their location and size.Start the program and observe the behavior of the widgets placed in the window.
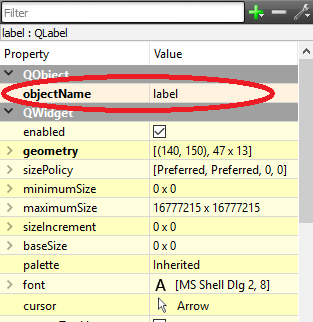
On the right side of Qt Designer there is a Property Editor, which is a set of fields allowing you to edit the properties of individual widgets. The information about the focused widget is displayed. Please note that the window itself is also a widget and has its own properties that can be edited in Property Editor. Each type of widget will have its own unique set of properties.
Each widget must have a unique name within the window. The name is given by editing the objectName property:

🛠🔥 Assignment 🛠🔥
Change the objectName for each widget in the window (e.g.:
QPushButton: addButton; QLineEdit:
inputValue1, inputValue2; QLabel:
result).
Widgets also have a number of other functionalities, mainly concerning their appearance:
- Change the content displayed in
QPushButton. - Change the title displayed on the
MainWindowbar. - Change the font displayed by the
QLabel. - Familiarize yourself with the enable property.
- Review the other properties of each widget.
Layout
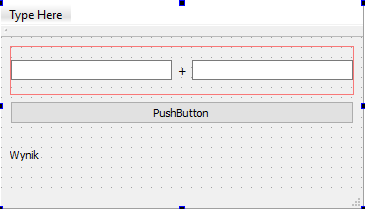
Widgets placed in the window are in no way related to the size of the window. Always, regardless of the size of the window, they will be anchored in a predefined position and will have a fixed size:
🛠🔥 Assignment 🛠🔥
Run the program and try to resize the window. Are the widgets always visible?
Qt has a system for automatically adjusting the position and size of widgets depending on the current appearance of the window they are in, called Layout. Layout is a widget in which you can place other GUI elements.
The basic method of placing elements on a window using Layout is a mechanism built into each window.
🛠🔥 Assignment 🛠🔥
Right-click on the window and from the context menu select Lay Out and then Lay Out in a Grid. Elements should be automatically placed in the window. Start the program and check the widgets’ behavior during window resizing.
It is possible to reorganize the window elements by drag-and-drop. Try to change the placement of the layout widgets. Run the program for different configurations and check the behavior.
It is possible to nest one layout inside another:
Select Horizontal Layout from the widget library and place it on the window.
Try to place the elements on the window so that the following effect can be achieved:

- Test how the program works.
Sometimes it is necessary to set a minimum and maximum size for each widget. Therefore you can find the properties of minimumSize and maximumSize for each widget.
An important widget, which builds the layout of the window, is Spacer, i.e. filler. They do not play any role other than adjusting the appearance of the window.
🛠🔥 Assignment 🛠🔥
Test the behavior of the program when changing the minimumSize and maximumSize of individual widgets.
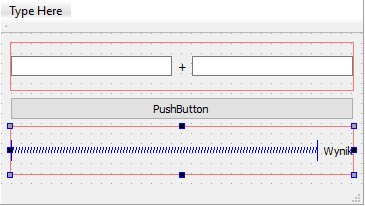
Try using Horizontal Spacer and Vertical Spacer (they also have minimum and maximum dimensions).
Use the Horizontal Layout and Horizontal Spacer to move the result (
QLabel) to the right edge of the window:

Signals and Slots
Qt implements a mechanism of signals and slots. It is a tool for
managing asynchronous events originating both from the program and from
the user or operating system. The use of signals and
slots is very simple. Every class inheriting from the
QObject in Qt can implement signals, i.e. functions that emit
an event, while at the same time every class can implement slots,
i.e. functions that capture and process these signals. For example, a
QPushButton class has a clicked() signal that
is emitted when user presses a button.
It is possible to automatically create connections between the GUI elements and the main window class from the Qt Designer level. Qt Creator automatically creates a slot and a connection between the widget signal and this slot:
🛠🔥 Assignment 🛠🔥
Use the right mouse button to select the addButton widget
(QPushButton) and from the context menu select Go to
Slot…, then select the signal clicked() and confirm
with OK.
Qt Creator moves the user to the editing mode, to the position of the
MainWindow class, where the method called when the button
is clicked was created:
void MainWindow::on_addButton_clicked()
{

}
At the same time Qt Creator automatically creates a slot declaration
in the class MainWindow (in the mainwindow.h
file):
class MainWindow : public QMainWindow {
    /* ... */
private slots:
    void on_pushButton_clicked();
    /* ... */
};
🛠🔥 Assignment 🛠🔥
Set breakpoint inside the slot handling method
(void MainWindow::on_AddButton_clicked()), run the program
in Debug mode. Verify the proper operation of the slot.
Access to GUI elements
All GUI elements become fields in the ui object, so the
access to them is always as follows: ui->objectName,
where objectName is the widget name given in the Property
Editor.
As in any object-oriented library, all GUI objects have methods to
modify their behavior and appearance. For example, in order to change
the text displayed by the QLabel it is necessary to
execute:
ui->objectName->setText("Hello! This is my first Qt application");🛠🔥 Assignment 🛠🔥
Place the above line in the method handling the button click.
Run the program and check its correctness. The content of the
QLabelshould be changed after clicking a button.
Reading the value from QLineEdit is done as follows:
QString text = ui->objectName->text();🛠🔥 Assignment 🛠🔥
Modify the program so that every time you press a button, it will cause the content of one of the
QLineEditto be written into theQLabel.Next, modify the program so that the value entered in the
QLineEditfields is added and displayed in theQLabelafter pressing the button.
To convert the QString into an integer, use the
QString::toInt( ) method:
QString text = ui->objectName->text();
int value = text.toInt();
To convert from a number to QString, use the static
method QString::number(value):
int value = 15;
QString text = QString::number(value);
Information about which methods a given widget or object of a given class offers is easiest to obtain from the Qt documentation page, e.g.: http://doc.qt.io/qt-5/qlabel.html.
Final assignments 🔥🛠
1. Calculator
The task is to create a simple graphical calculator. The calculator should have
- 2 active QLineEdit fields, in which the user will be able to enter values for which the action will be performed.
- Inactive (enabled = false)
QLineEditfield, to which the result will be sent. - “Calculate” button.
- Four
QRadioButton, representing which activity is used (addition, subtraction, multiplication, division).QRadioButtoncan be grouped using theQGroupBox. - CE button that deletes both the contents of the input and output fields.
- Two
QLabelon which the result is displayed in binary and hexadecimal notation.
2. Advanced calculator
Create a calculator similar to the one available in Windows. The
window should have a field where you can enter the value manually using
the keyboard, or using the 0 to 9 buttons below. To format the
QLineEdit input value, use its inputMask
property. Each press of the numeric button adds the appropriate value at
the end of the input window. Try using QButtonGroup. Create
a second group of buttons responsible for selecting the type of action
and displaying the result.
3. Database editor
Create a program that is an interface to the student database. The user should be able to add a new entry using the fields: Name, Surname, E-mail, Index No., Man/Woman (QRadioButton), Field of study (drop-down list - QComboBox), Graduated (QCheckBox), Note (QPlainTextEdit). Create a student class containing the above information and add new entries to QVector. The list of available entries should be displayed in the QListView. Add the ability of previewing and deleting the selected entry.
Authors: Tomasz Mańkowski, Jakub Tomczyński